Printing Gorgeous Large Scale Battle Maps

As we slowly move back to actual tabletop play, we’re finding renewed interest in the pen-and-paper parts of the game. But after a year of playing on Roll20, we have fallen in love with those flashy battle maps. Going back to hand-drawn maps on a wet-erase grid seemed like a little bit of a let down.
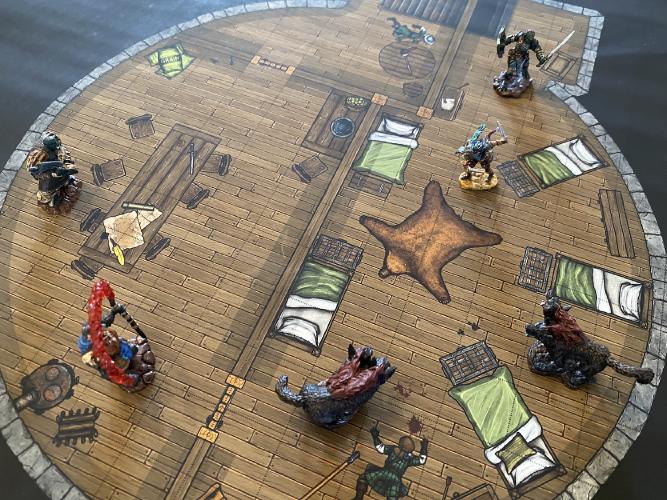
So we at Loot & Liar decided to experiment. We took an encounter map we created in Dungeon Draft and explored our printing options.
In this article, we talk about how we created and exported the map, and how we scaled the image (the easy way). Then we look at three ways to print the map (modular, sliced, and commercially printed). We ended up commercially printing ours. And the result was stunning.
Creating the Map
There are many freely available maps online. And we know of dozens of artists who provide cheap premium maps for download. A few of our favorites are Mike Schley and 2 Minute Tabletop.
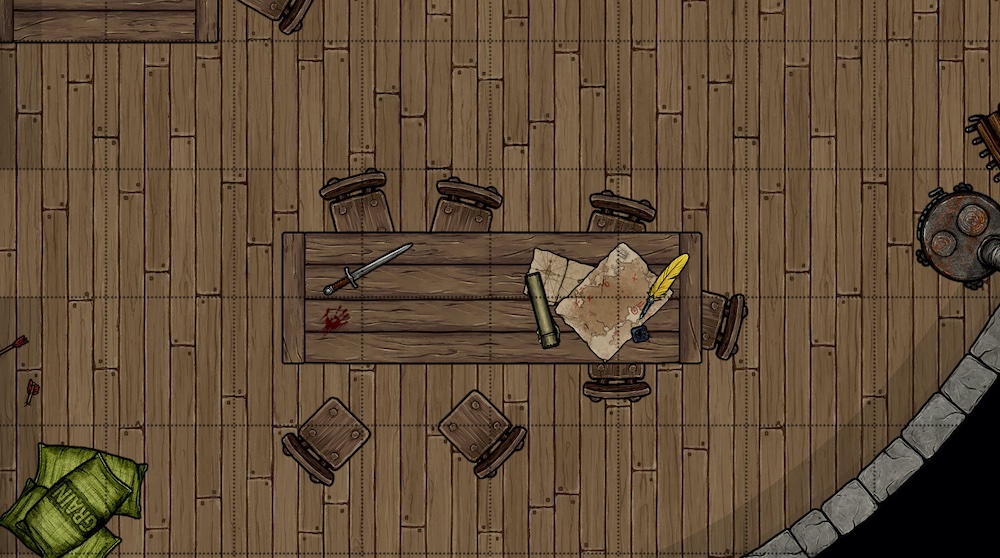
But we also enjoy making maps ourselves. It is fun to realize that exact layout you have in mind, and also fun to hide little things here and there for your players. For example, in our map, we placed a few pieces of paper on a table. In-game, these papers hold a clue to help the party reach their next milestone.
Earlier this year, we reviewed Campaign Cartographer. In this tutorial, we’ll use another of our favorites: Dungeon Draft. We’re also using the Forgotten Adventures Dungeon Draft Integration. (We use the full Patreon version. It’s worth every penny).
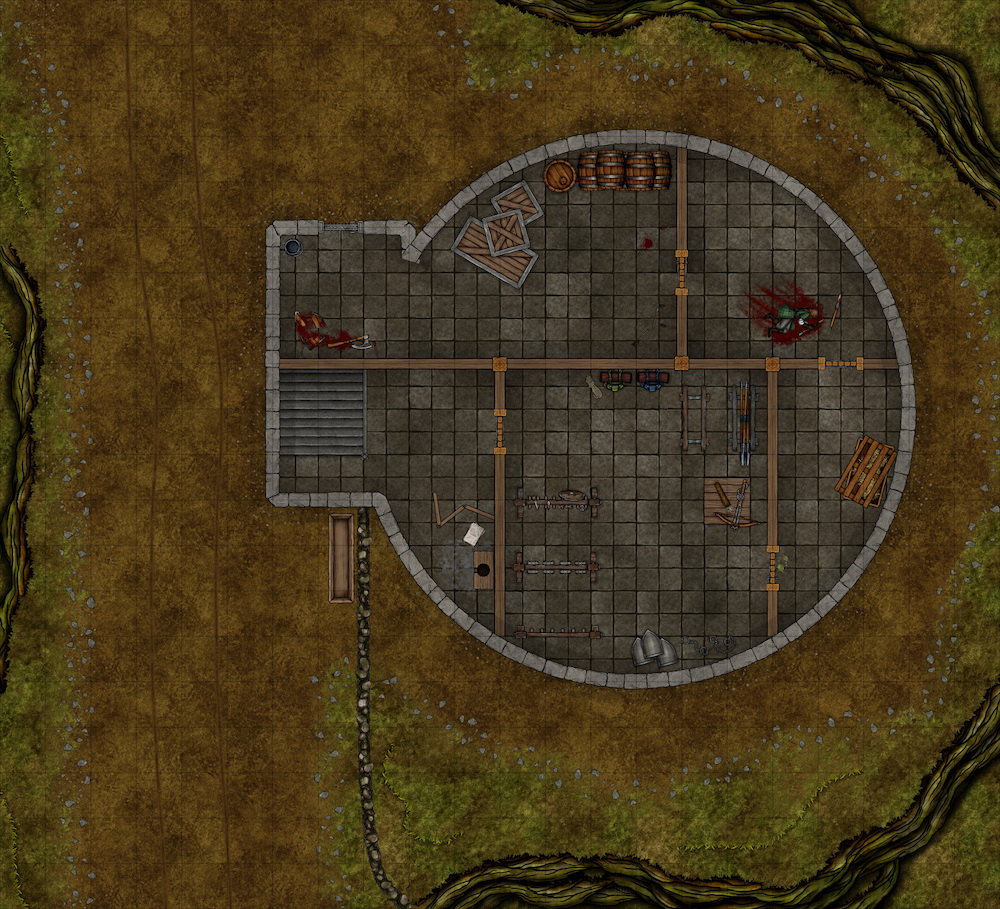
We created a four story tower in Dungeon Draft. The base map size is 22 grid squares by 20 grid squares. Using a one-inch grid, that’s 22" x 20". These dimensions do not match a standard paper size, which added a little bit of a complication. We’ll talk about that later, exploring three options for large printing.
Exporting The Map to Image Files
Dungeon Draft makes it easy to create multi-level maps. Each level can then be exported as a separate file. So once we were done creating the map, we just exported each level.

Exporting was the first step that required really thinking about paper layout.
When it comes to the Export Mode, we chose JPEG. JPEG is a “lossy” format designed for images with lots of different colors and patterns. The Forgotten Adventures assets are rich in color and texture, so JPEG works better. (The default Dungeon Draft assets, in contrast, might be fine as PNG files.) We knew the resulting image size would be important if we were to email the image to a print service.
Dungeon Draft provides the option of overlaying a grid. We selected that option. Often times, when we play on Roll20, we turn off the grid on the map and use Roll20’s grid instead. But we wanted the grid to be on the printed version. And it turned out that the print shop liked the grid because it was easy to check measurements.
Dungeon Draft has several Grid Presets options. Unsurprisingly, when using Roll20, we use the Roll20 preset. But we learned the hard way that the resulting preset is far too small for printing. By trial and error, we arrived at the Best Quality setting for printing. We’re super thankful that the local Minuteman print shop exchanged several emails with us to look at our images and recommend settings.
With Best Quality, the files Dungeon Draft creates are large, but not huge. Each layer (saved as a JPEG) was between 3M and 9M. With that, we hit Export, repeating this export process for each level of our tower.
Scaling the Image
We chose Best Quality because we were planning on printing on a commercial printer (Option 3). If you are printing on a regular printer, you might need to scale the image down. (Best Quality would give you a grid larger than 1".)
While trying our hand at scaling, we read lots of blogs detailing complicated processes. (Some actually involved doing MATH!!!) But we found a much simpler way. Find a graphics program that supports measurements in inches (not just pixels). Then count the number of grid squares on the horizontal dimension. Then scale the image to that number.
On a Mac, this can easily be done with the built-in Preview app. We opened the map in Preview, then we went to Tools > Adjust Size and filled it in as follows:
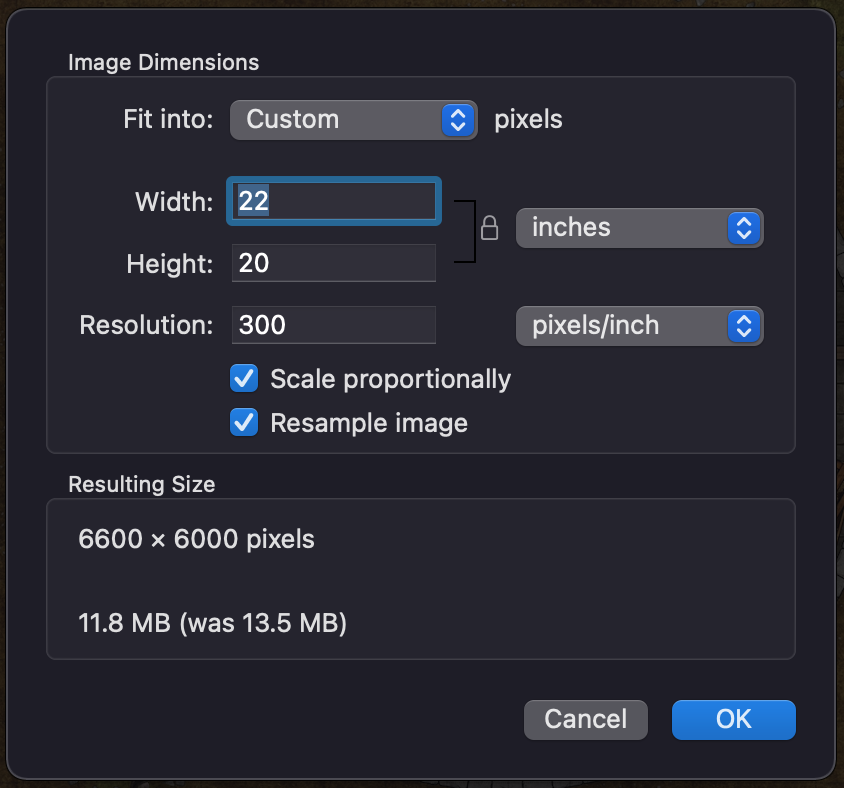
Then we saved the image.
Printing The Map
In our view, a desireable feature of printing maps is getting the scale right so that you can use your minis on the map. That means that each square is typically 1" x 1".
If your map is bigger than a standard sheet of paper (8.5 x 11 inches in the US), then you’ll need to get creative. We explored three different options:
Option 1: Redesign the Map as Small Rooms
Our first option was to redesign the map so that each room fit on one sheet of paper. Then just print the map one room at a time. For a dungeon with a lot of rectangular rooms separated by halls or tunnels, this would work well.
If you design your map with this option in mind, it may be the easiest way to build large-scale dungeons. But in our case, we already had the map done. And its circular shape was not easy to break into smaller maps.
If you want to go the pre-drawn mapping rout, some of the Dyson Logos maps are designed to be printed this way.
Option 2: Split, Print, Tape
Our second option was to split each floor’s image into smaller images. For example, if an image’s grid is 22" x 20", then it can be split into six images, each of which could be printed on its own page. Once the pages are printed, they can be pasted or taped together.
But how do you chop up a big image into multiple printable pieces?
The open source (and free) tool called PosteRazor makes this process easy. There is even a version that runs in your browser.
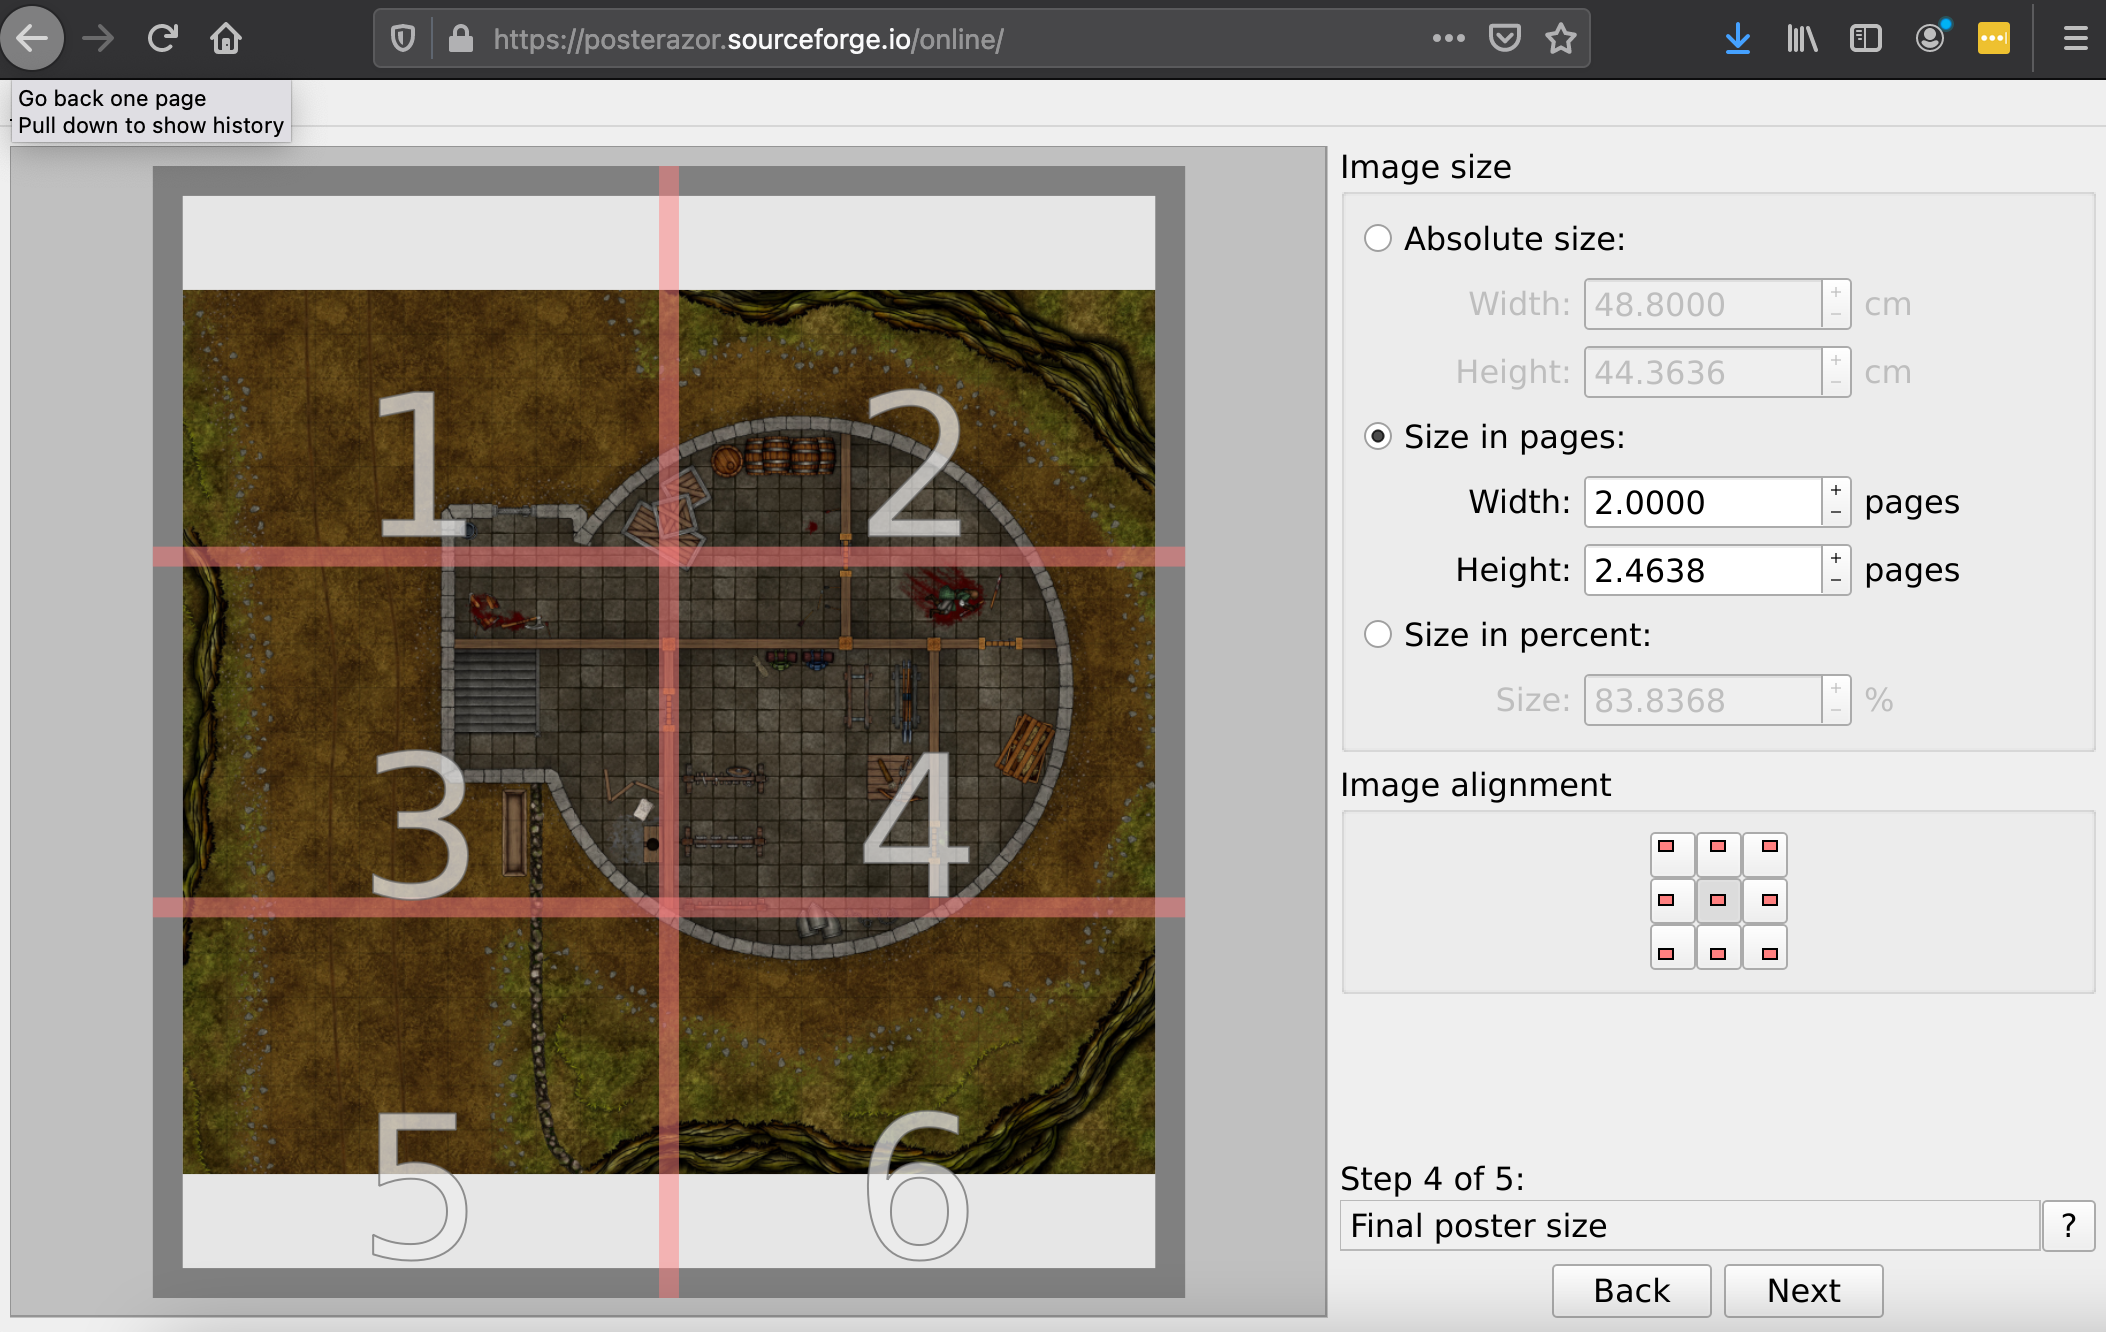
We used PosteRazor (the browser version) to split the ground floor map into six sheets of 8.5" x 11" paper. PosteRazor creates a PDF with all of the pages, and you can then just print the PDF file. It was dead simple, and took less than five minutes to upload and chop up the image.
Note that we resized the image, as described above, before loading it into PosteRazor.
With something like PosteRazor, your cost is reduced to just ink and paper, but taped-together maps are a little tedious to prepare, and perhaps not as attractive as they could be. That leads us to the third option.
Option 3: Commercial Printing
From local print shops to large chains like FedEx Kinkos or Staples, chances are good that you have a commercial printing service available somewhere nearby.
We chatted with our local Minuteman Press. They were amazingly helpful, even working with us to get those pesky export settings right on Dungeon Draft. We didn’t scale our images down for them–we sent the files as Best Quality. Minuteman did the scaling for us.
Large-scale printing is constrained (just like small-scale printing) by page size. But many print shops can print poster sizes. The largest map our print shop could do was 36" x 40", which was not a problem for our comparatively small map. You may also be asked to select a paper type. I asked for a thin poster paper, but the print shop had to go with a slightly thicker paper because of the amount of ink required for my map.
Commercial printing was expensive (at just under $15 per sheet), but the results were astounding.
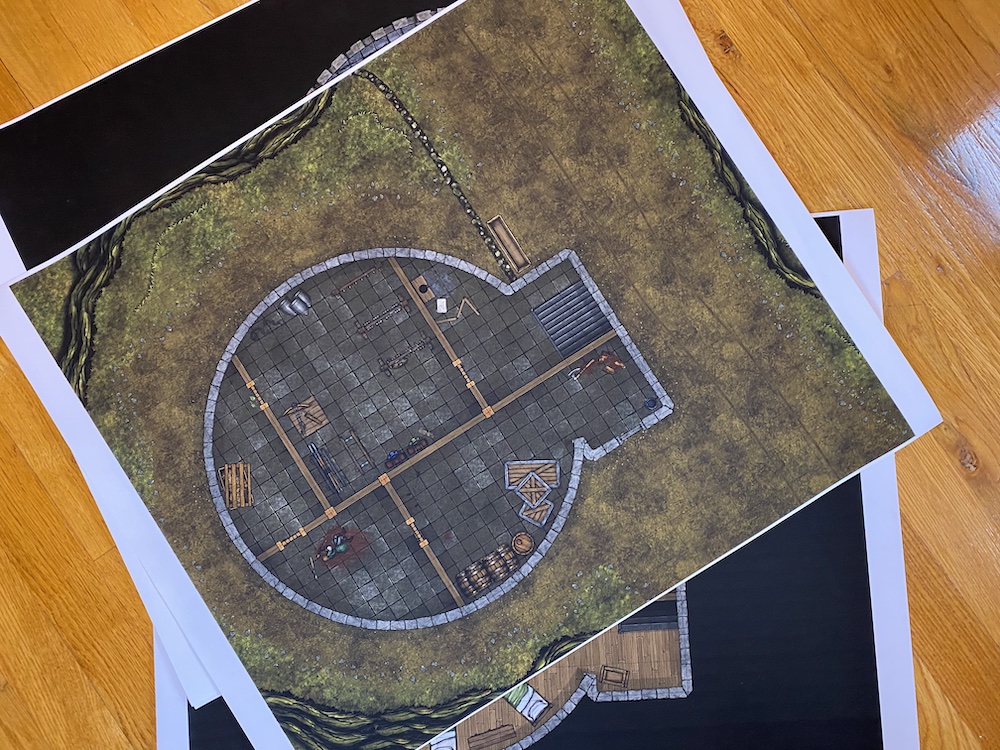
The colors were beautiful and vivid. The lines were crisp. And on the heavier paper, they didn’t easily crease, tear, or bend.
Conclusion
In the end, we were absolutely thrilled with our commercially printed map. Cheap? No. And we probably won’t do this for every map in every game. But it sure was a delight. For those big epic combat scenes, it is worth it to us.
We will likely make use of the other two options, too, for printing maps on our desktop printer.